1、SSHログイン、スーパーユーザ。
まずはdebian9をインストールしたWindowsマシンのIPアドレスを調べる必要があるのでインストール時に作ったIDとパスワードを入力しログインして
$ ip -f inet addr
LAN内でルータから振り分けられたIPアドレスが表示される。
**********-no-MacBook-Pro:~ ****$ ssh -l **** 192.168.*.*
*@192.168.*.*'s password:
Linux lavie 4.9.0-3-686 #1 SMP Debian 4.9.30-2+deb9u1 (2017-06-18) i686
The programs included with the Debian GNU/Linux system are free software;
the exact distribution terms for each program are described in the
individual files in /usr/share/doc/*/copyright.
Debian GNU/Linux comes with ABSOLUTELY NO WARRANTY, to the extent
permitted by applicable law.
Last login: Tue Jun 27 11:23:09 2017 from 192.168.*.*
****@lavie:~$ su
パスワード:
root@lavie:/home/****# (*は環境により任意)
IPアドレスがわかれば他のPCからSSHでログインしてスーパーユーザになる。
自分はMac環境なので純正ソフトのターミナルからSSHでログインするがWindows環境の場合はTera Termで同様の事を行う。


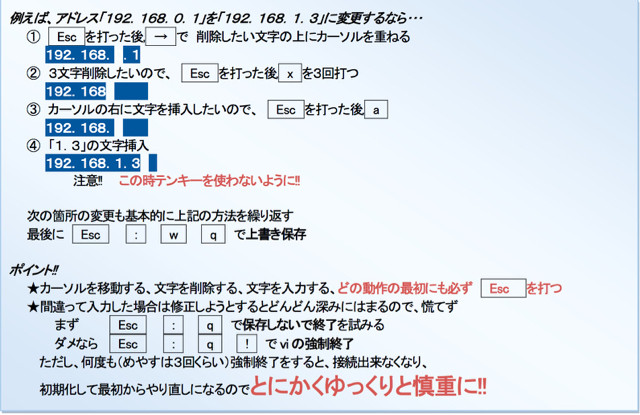
2、viの使い方。
さてここからLinuxの標準エディタである「vi」を使わなくてはならない。
debianに限らずLinuxを操作する上では必須であり挫折するほとんどの人はこの「vi」の箇所だろう。
いわゆる鬼門になるのだが慣れてしまえばそれほど難解ではない。
3、ネットワーク設定
サーバーとして使う場合ローカルのIPアドレスを固定しておかないとルーターとの連携がうまく取れないのでまずデフォルトのDHCPサーバーに任せた設定から変更する。
# vi /etc/network/interfaces
# iface * inet dhcp コメント化
ここから追加↓
iface * inet static
address 192.168.*.*
netmask 255.255.255.0
gateway 192.168.*.1
# reboot(再起動)
4、NTPサーバーのインストール。
# apt-get install ntp
# vi /etc/ntp.conf
18行目からコメント化。
# pool 0.debian.pool.ntp.org iburst
# pool 1.debian.pool.ntp.org iburst
# pool 2.debian.pool.ntp.org iburst
# pool 3.debian.pool.ntp.org iburst
ここから追加↓
server ntp1.jst.mfeed.ad.jp
server ntp2.jst.mfeed.ad.jp
server ntp3.jst.mfeed.ad.jp
50行目
restrict 10.0.0.0 mask 255.255.255.0 nomodify notrap
追加
# systemctl restart ntp NTPサーバーリスタート。
動作確認
# ntpq -p
remote refid st t when poll reach delay offset jitter
==============================================================================
ntp1.jst.mfeed. 133.243.236.17 2 u 8 64 1 18.291 1.774 0.001
ntp2.jst.mfeed. 133.243.236.17 2 u 11 64 1 21.648 1.767 0.001
ntp3.jst.mfeed. 133.243.236.17 2 u 11 64 1 21.118 2.234 0.001
5、FTPサーバー
Debian9からはaptitudeコマンドが使えないようなので
# apt-get update
# apt-get install proftpd
# vi /etc/proftpd/proftpd.conf
11行目「off」に変更
UseIPv6 off
15行目 サーバー名変更
ServerName "任意のサーバー名"
DisplayLogin welcome.msg
DisplayChdir .message true
ListOptions "-l"
DenyFilter \*.*/
の次に
DefaultRoot ~ !root !****(メインユーザー名)
任意のユーザ以外ホームディレクトリより上位を表示させない。
AllowStoreRestart on
アップロードのレジュームをオン
AllowRetrieveRestart on
ダウンロードのレジュームをオン
IdentLookups off
リモートユーザ名を確認しない
UseReverseDNS off
DNSの逆引きを行わない
を追記する。
# systemctl restart proftpd
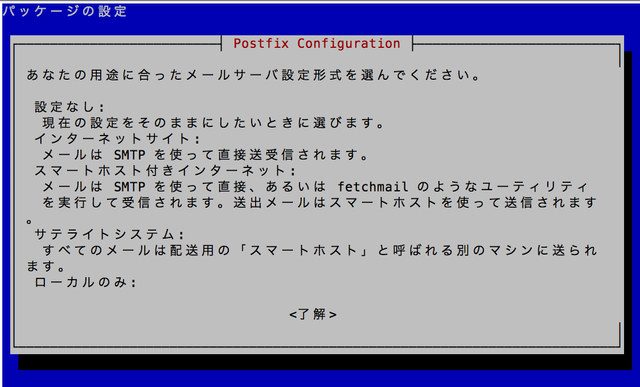
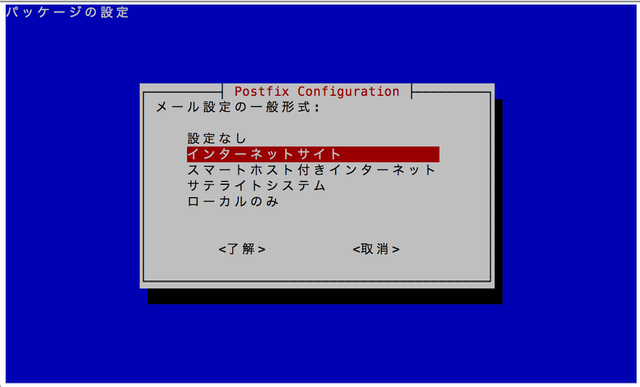
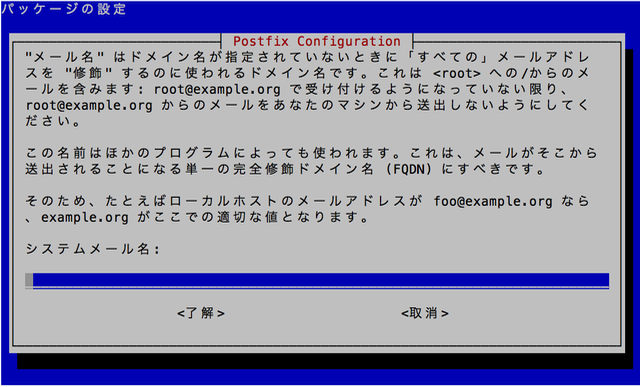
6、メールサーバー(Postfix)SMTPのみ。
# apt-get install postfix
メディア変更:
'Debian GNU/Linux 9.0.0 _Stretch_ - Official i386 DVD Binary-1 20170617-14:24'
とラベルの付いたディスクをドライブ '/media/cdrom/' に入れて [Enter] キーを押してください。
と時々インストールディスクを入れろと言ってくる。


# vi /etc/postfix/main.cf
myhostname = 任意のドメインネーム
relayhost = メールサーバー稼働が可能なプロバイダならばサイトを見ればどこかにかいてあるハズ。
ちなみにぷららの場合だとmmr.plala.or.jp
# vi /etc/postfix/master.cf
サブミッションポートの設定
16行目
#submission inet n - - - - smtpd
の#を消してコメント解除。
# systemctl restart postfix
Apache2設定の最終回に続く。
この記事は自分が忘備録として書いているだけなので正確性も保証しかねるし問題が起きても質問にも答えられないし責任も取れない。
debianはフリーのOSなのでそのへんは全て自己責任ということになるのを覚悟で実行してもらいたい。